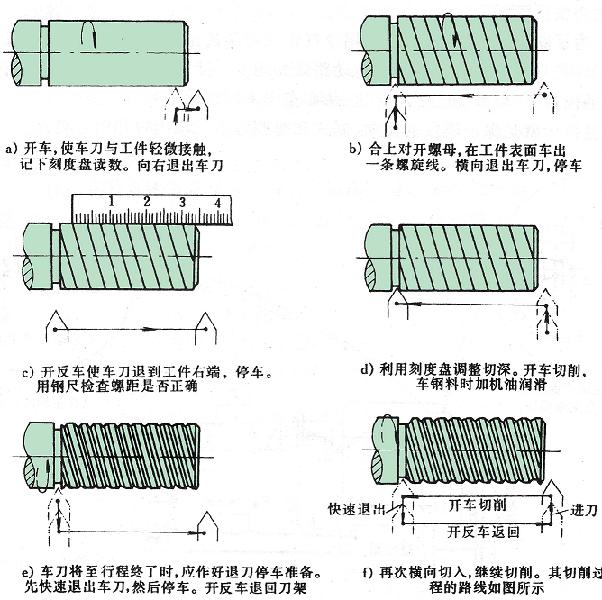
Lathe attachment and how to use it (figure)
2) According to the thread size, the outer circumference of the thread is threaded, and the thread length end line is engraved according to the required length. First push the outer diameter of the thread to the size, and then use the tip of the tool to engrave a micro-visible line at the end of the thread on the workpiece, as a retraction mark for the thread.
3) According to the pitch P of the workpiece, check the sign on the machine tool, then adjust the position of the handle on the feed box and replace the number of teeth of the hanging wheel box gear to obtain the required workpiece pitch.
4) Determine the spindle speed. Beginners should adjust the spindle speed of the lathe to the lowest speed.
(2) Methods and steps of threading
1) Determine the starting position of the cutting depth of the thread, adjust the scale of the middle slide to zero, drive, make the tip touch the surface of the workpiece slightly, and then quickly adjust the scale of the middle slide to zero to facilitate the counting of the feed.
2) Trial the first spiral and check the pitch. Shake the saddle to 8~10 teeth from the end face of the workpiece, and the lateral feed is about 0.05. Drive, close the opening and closing nut, drive a spiral on the surface of the workpiece, exit the turning tool at the end of the thread, and retract the turning tool to the right end of the workpiece; stop and check if the pitch is correct with a steel ruler. As shown in Figure 4a.
3) Adjust the amount of backing knife with the dial and drive the cutting, as shown in Figure 4d. The relationship between the total back-feeding amount of the thread a p and the pitch is according to the empirical formula a p ≈ 0.65P, and the amount of the back-feeding knife is about 0.1.
4) When the turning tool is at the end, you should prepare for the retracting of the knife, first exit the turning tool quickly, then open the anti-vehicle to exit the tool holder. Figure 4e.
5) Feed the knife again in the transverse direction and continue cutting to the correct tooth shape as shown in Figure 4f.

Figure 4 thread cutting method and steps
3. Thread turning considerations
1) Pay attention to and eliminate the "empty stroke" of the carriage
2) Avoid “disordersâ€. When the first spiral car is good, after the second feeding, the cutting edge is not in the original spiral (spiral pile), but left or right, even in the middle of the crest, the thread car chaos This phenomenon is called “disorderingâ€. The method of preventing disorder is to use reverse (positive and reverse) car turning. When moving the thread in the corner left and right, the moving distance of the small carriage should not be too large. If the tool is damaged during the turning, the tool needs to be changed again or the opening and closing nut is unintentionally lifted.
Previous page next page
Matters needing attention
1. In the process of using the wire cutters, do not injure, damage or burn the insulated handle, and pay attention to moisture;
2. In order to prevent rust, the clamp shaft should be refueled frequently;
3. Keep a distance of more than 2cm between your hands and the metal part of the wire cutters when operating with power on;
4. Choose wire cutters of different specifications according to different uses;
5. Can not be used as a hammer;
Safety knowledge
1. Before using wire cutters, it is necessary to check whether the insulation of the insulation handle is in good condition. If the insulation is damaged, it is very dangerous to carry out live work, and electric shock accident may occur.
2. When cutting a live wire with wire cutters, do not cut the live wire and the neutral wire at the same time with the knife edge to avoid short circuit fault;
3. Pay attention to the safe distance between the metal part of the clamp head and the charged body when working with electricity.
Combination Pliers,Combination Cutting Plier,Knipex Needle Nose Combination Pliers,Vise Grip Combination Pliers
Henan Huajiang Industry Co.,Ltd , https://www.hj-industry.com