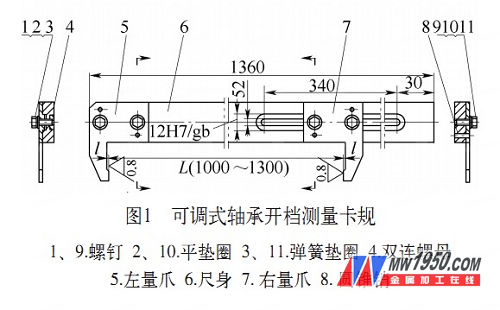
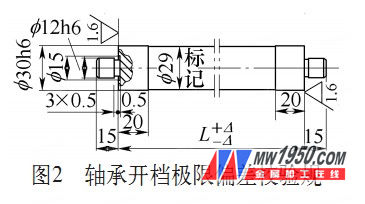
All kinds of rubber roller and nylon roller components produced by our company are equipped with rolling bearings at both ends, and the components are matched with the rubber frame whose opening distance is not adjustable, and the rubber frame is fixed on the frame wall plate, so the processing glue Rolls or nylon rolls have two dimensions that must be tightly controlled within the limits. If the size is too large, it cannot be matched with the rubber frame. Even if the opening size meets the requirements, if the length of the shaft head matched with the rolling bearing exceeds the actual width of the bearing, it will not be able to cooperate with the rubber frame. In order to ensure that the opening size and the length of the shaft head can be controlled within the tolerance range, if each piece is measured with a cumbersome ultra-long precision vernier caliper, in actual operation, two people need to coordinate the operation to measure the reading, and this kind of reading Frequent use of sophisticated large gauges will inevitably shorten the life of the vernier caliper. Based on this consideration, the author designed the adjustable bearing open-end measuring caliper shown in Figure 1, and the matching bearing opening deviation deviation calibration gauge.


When the caliper structure member shown in Fig. 1 is used, the screw 1 can be loosened to move the right claw 7 so as to be in contact with the end surface of the calibration gauge L shown in Fig. 2, which is the standard opening size. The tightening screw 1 can directly clamp the measured work.
Manufacturing technical requirements:
(1) ruler
45 steel, normalizing treatment hardness 180-230H BW, ruler straight side straightness 0.05mm, right-end working groove, length 340mm, front groove and right claw 7 with dimensional accuracy of 12H7/g6, depth 2.8mm, corresponding surface The groove width is 12 mm and the depth is 3 mm, and the double joint nut 4 is slidably fitted.
(2) Left paw
The material 40Cr has a measuring surface roughness value R a=0.8 μm, and the measuring surface is quenched by 50 to 55 HRC, and is positioned with a taper pin 8 after being fixed to the ruled body.
(3) right claw
The material 40Cr, the measured surface roughness value R a=0.8μm is fastened by the screw 1, the flat washer 2, the spring washer 3 and the double-connected nut 4 and the ruler 6, and the left and right claw measuring faces should be in contact with the end face of the calibration gauge. There is no light transmission in the close.
(4) Double nut
The material 45 steel is embedded in the 6-shaped groove of the ruler and coupled with the screw 1 to be freely slid in the groove and fixed at any position.
Use effect: Since the ruler is lighter than the super long vernier caliper, it is convenient to adjust and measure, and does not need two people to coordinate operation, and can effectively prevent measurement errors and cause workpiece manufacturing errors.
Bridge Faucets,bridge kitchen faucet,Bridge Faucets price
Yuyao Zelin Sanitary Ware Co., Ltd , https://www.kitchen-sinkfaucet.com